この記事では「GSAPでテキストアニメーションの実装方法」について解説します。GSAPを使えば、テキストアニメーションを簡単に実装することができます。
おしゃれな参考サイトではGSAPを使ってアニメーションをしているサイトが多く、テキストアニメーションもGSAPで使っていることが多いです。
テキストアニメーションができると、動きのあるおしゃれなサイトができます。
- テキストアニメーションの基本的な実装方法がわかる
なお、GSAPの導入方法や基本的な使い方については、以下の記事をご覧ください。
scrollTriggerの導入方法や使い方については、以下の記事をご覧ください。
GSAPでテキストアニメーションを実装
GSAPでテキストアニメーションを実装する場合は、以下のコードで実現できます。
See the Pen ScrollTrigger-stagger by 山中滉大 (@tips-web) on CodePen.
<div class="container">
    <section class="box">
      <div class="inner">
        <h2>Scroll ↓</h2>
      </div>
    </section>
    <section class="seciton">
      <div class="inner">
        <h2 class="text">gsapでテキストアニメーション</h2>
      </div>
    </section>
 </div>
body {
min-height: 100vh;
}
.container {
padding-top: 500px;
padding-bottom: 400px;
}
.inner {
margin-left: 50px;
margin-right: 50px;
}
.seciton {
padding-top: 80px;
padding-bottom: 80px;
}
.seciton:nth-child(2) {
background: pink;
}gsap.fromTo(".text", {
autoAlpha: 0,
y: 20,
}, {
scrollTrigger: {
trigger: ".seciton",
start: "top center",
markers: true,
},
y: 0,
autoAlpha: 1,
});
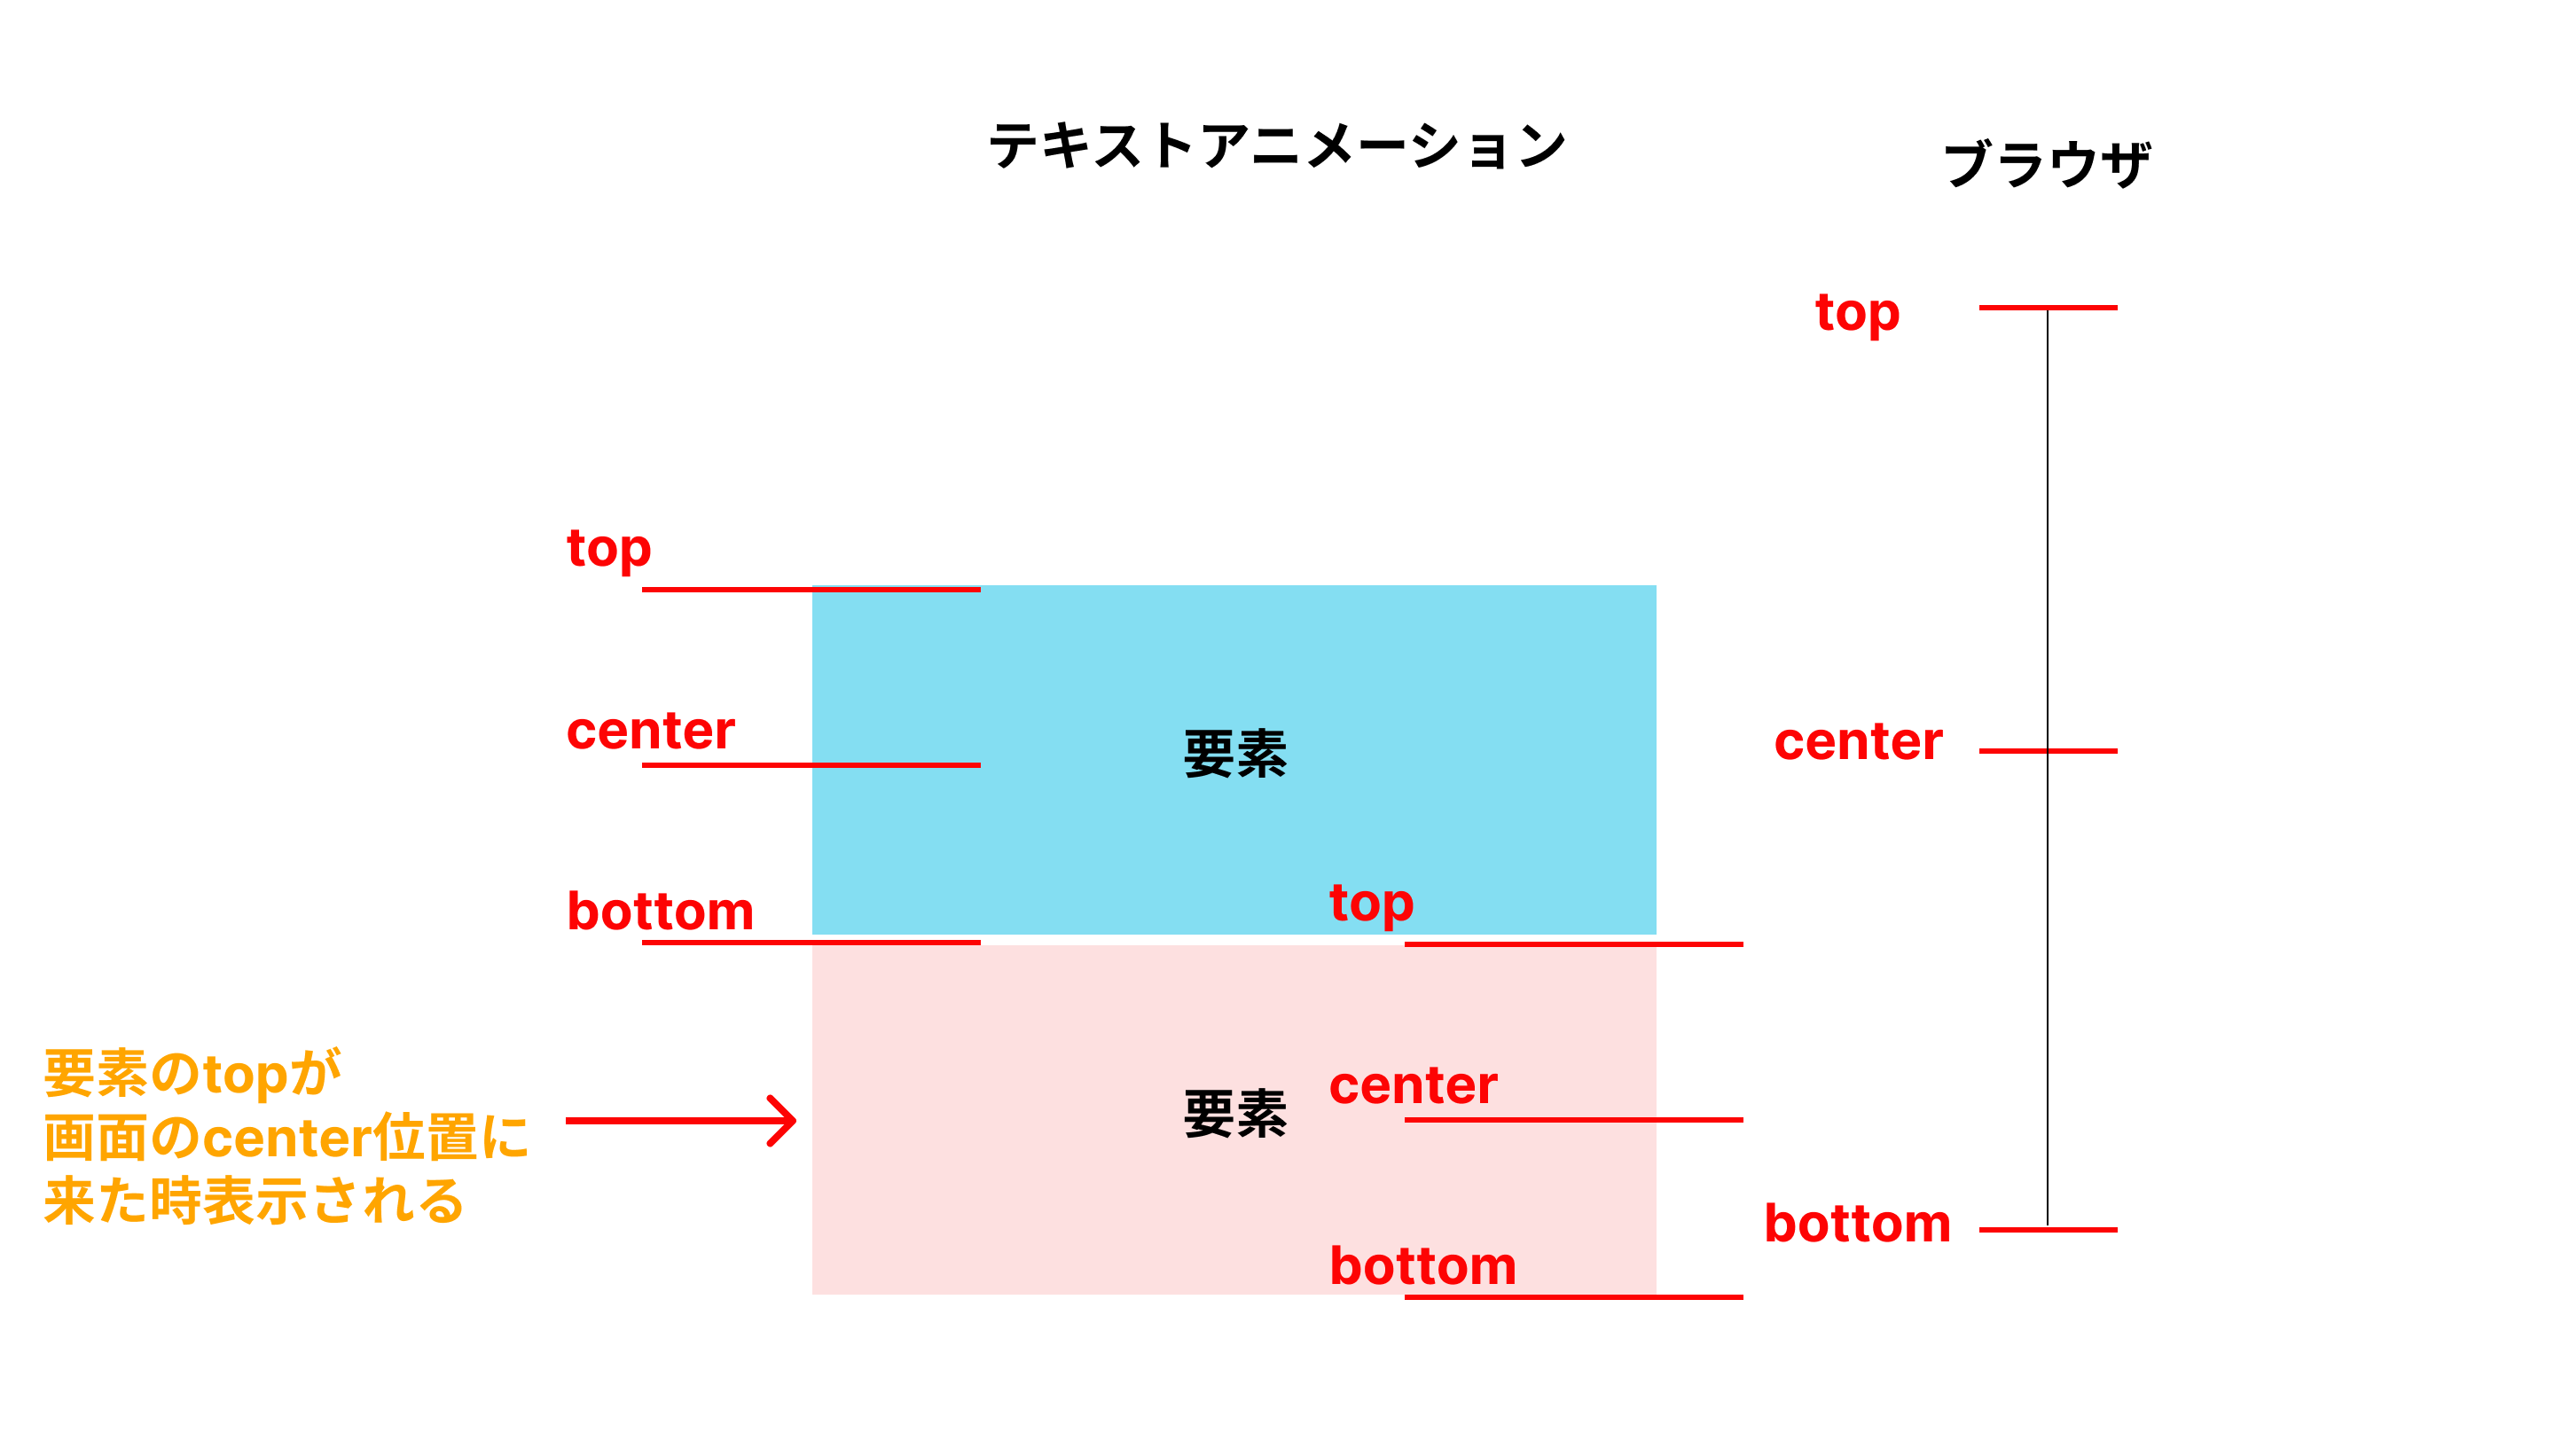
画面をスクロールすると、セクションが画面中央に来たとき、text要素が下からふわっと表示されます。
以下の部分で、アニメーション前の初期状態を適用しています。
gsap.fromTo(".text", {
    // 初期状態を指定
    autoAlpha: 0, // 不透明度0
    y: 20,// y座標に20px下げた位置に配置
},
以下の部分で、アニメーション後の状態を適用しています。
{
  y: 0,//y座標0pxの位置
  autoAlpha: 1, //不透明度1
  scrollTrigger: {
    trigger: ".seciton", //トリガーとなる要素
    start: "top center", //トリガー位置
    markers: true,
  },
}
autoAlphaは要素の不透明度を指定できるプロパティで、0で透明、1で不透明です。
要素が複数ある場合のテキストアニメーション
要素が複数あるアニメーションをする場合、以下のようなコードで実現できます。
See the Pen テキストアニメーション1 by 山中滉大 (@tips-web) on CodePen.
<div class="container">
    <section class="seciton">
      <div class="inner">
        <h2>Scroll ↓</h2>
      </div>
    </section>
    <section class="seciton">
      <div class="inner">
        <h2 class="text">gsapでテキストアニメーション</h2>
      </div>
    </section>
    <section class="seciton">
      <div class="inner">
        <h2 class="text">gsapでテキストアニメーション</h2>
      </div>
    </section>
    <section class="seciton">
      <div class="inner">
        <h2 class="text">gsapでテキストアニメーション</h2>
      </div>
    </section>
  </div>
body {
min-height: 100vh;
}
.container {
padding-top: 500px;
padding-bottom: 400px;
}
.inner {
margin-left: 50px;
margin-right: 50px;
}
.seciton {
padding-top: 80px;
padding-bottom: 80px;
}
.seciton:nth-child(2) {
background: pink;
}
.seciton:nth-child(4) {
background: skyblue;
}const sectionTexts = document.querySelectorAll('.text');
sectionTexts.forEach((title) => {
gsap.fromTo(title, {
autoAlpha: 0,
y: 20,
}, {
autoAlpha: 1,
y: 0,
scrollTrigger: {
trigger: title.closest('.seciton'),
start: 'top center',
markers: true
},
});
});画面をスクロールして、各セクションが画面中央の位置に達すると、text要素が下から上にふわっと表示されます。
次のようなイメージをするといいでしょう。

text要素は複数あるので、以下の部分で全てのtext要素を取得し変数に格納します。
const sectionTexts = document.querySelectorAll('.text');全ての要素に対してアニメーションしたいので、forEach文を使います。
sectionTexts.forEach((title) => {
 //ここにgsapのコードを記述

});
以下の部分で、アニメーション前の状態を適用しています。
autoAlphaで要素を透明にして、y座標に20px下げた状態に指定します。
gsap.fromTo(title, {
    // 初期状態を指定
    autoAlpha: 0, // 不透明度0
    y: 20,// y座標に20px下げた位置に配置
  },
以下の部分でアニメーション後の状態を指定します。
autoAlphaを1にして要素を表示、y座標をもとに戻します。scrollTriggerでsection要素をアニメーションのトリガーとして設定しています。
{
    // 最終状態を指定
    autoAlpha: 1, //不透明度1
    y: 0, //y座標を0pxに配置
    scrollTrigger: {
      trigger: title.closest('.seciton'), // トリガーとなる要素
      start: 'top center',// アニメーションを開始するスクロール位置を指定
      markers: true
    },
  }
トリガーとなる要素は、以下の部分で変数title(.text)の親要素である.sectionを指定しています。
trigger: title.closest('.seciton')まとめ
テキストアニメーションについて解説しました。
アニメーションしたい要素が複数ある場合とそうでない場合があるので、状況に応じてJavaScriptを書き換えましょう。
GSAPで本格的な学習をするためには10日間で学べるこちらの講座がおすすめです!
【たった"10日間"でWEBアニメーション実装スキル習得】GSAPマスター講座
.jpg)


