.jpg)
この記事では「CSSで画像の上に文字とボタンをのせる方法」について解説します。
ファーストビューでよく見かける実装なので、覚えておきましょう!
- 画像の上に文字とボタンをのせる実装方法についてわかる
- FVのコーディング時に応用することができる
こちらのレイアウトもよく見かける実装なので、あわせてご一読ください。
画像の上に文字とボタンをのせる実装方法
画像の上に文字とボタンをのせる実装コードは以下になります。
See the Pen 画像の上に文字とボタンをのせる by 山中滉大 (@tips-web) on CodePen.
  <div class="p-fv">
    <div class="p-fv__inner">
      <div class="p-fv__img">
        <img src="test1.jpg" alt="">
      </div>
      <div class="p-fv__textBox">
        <h1 class="p-fv__copy">キャッチコピー</h1>
        <p class="p-fv__text">テキストテキストテキストテキストテキストテキスト</p>
        <a href="" class="p-fv__button">ボタン</a>
      </div>
    </div>
  </div>
body{
margin: 0;
padding: 0;
font-family: 'Noto Sans JP', sans-serif;
}
.p-fv {
height: 100vh;
width: 100%;
overflow: hidden;
}
.p-fv__inner {
position: relative;
width: inherit;
height: inherit;
}
.p-fv__textBox {
position: absolute;
top: 50%;
left: 50%;
transform: translate(-50%,-50%);
width: 100%;
text-align: center;
max-width: 500px;
z-index: 2;
background-color: lightblue;
padding: 16px;
}
.p-fv__img {
width: 100%;
height: 100%;
position: relative;
z-index: 1;
}
.p-fv__img::before {
content: '';
position: absolute;
top: 0;
left: 0;
width: 100%;
height: 100%;
background-color: rgba(0,0,0,0.6);
z-index: 0;
}
.p-fv__img img {
height: 100%;
width: 100%;
display: block;
object-fit: cover;
}
.p-fv__button {
display: block;
padding: 8px 16px;
color: #fff;
text-decoration: none;
font-weight: bold;
margin-top: 16px;
background-color: orange;
}
.p-fv__copy {
margin: 0;
font-size: 28px;
color: white;
}
.p-fv__text {
color: white;
margin: 0;
margin-top: 15px;
font-size: 16px;
}

今回の実装イメージは以下になります。
ここからコードを解説していきます。
HTMLの解説
HTMLのコードは以下になります。
<div class="p-fv">
    <div class="p-fv__inner">
      <div class="p-fv__img">
        <img src="test1.jpg" alt="背景画像">
      </div>
      <div class="p-fv__textBox">
        <h1 class="p-fv__copy">キャッチコピー</h1>
        <p class="p-fv__text">テキストテキストテキストテキストテキストテキスト</p>
        <a href="" class="p-fv__button">ボタン</a>
      </div>
    </div>
  </div>
今回、背景画像をimgタグで実装していますが、背景画像をbackgroundプロパティで実装することもできます。
画像とテキストのコンテンツ(キャッチコピーやボタンなど)は、p-fv__inner要素の中に格納しておきます。画像とテキストのコンテンツを重ねる場合は、後述するCSSで行います。
CSSの解説
CSSで画像とテキストのコンテンツを重ねる場合、以下のようにpositionプロパティを使用します。
/* 絶対配置したい要素の親要素にposition: relative;指定 */
.p-fv__inner {
  position: relative;
  width: inherit;
  height: inherit;
}


/* 絶対配置する要素にposition: absolute;指定 */
.p-fv__textBox {
  position: absolute;
  top: 50%;
  left: 50%;
  transform: translate(-50%,-50%);
  width: 100%;
  text-align: center;
  max-width: 500px;
  z-index: 2;
  background-color: lightblue;
  padding: 16px;
}
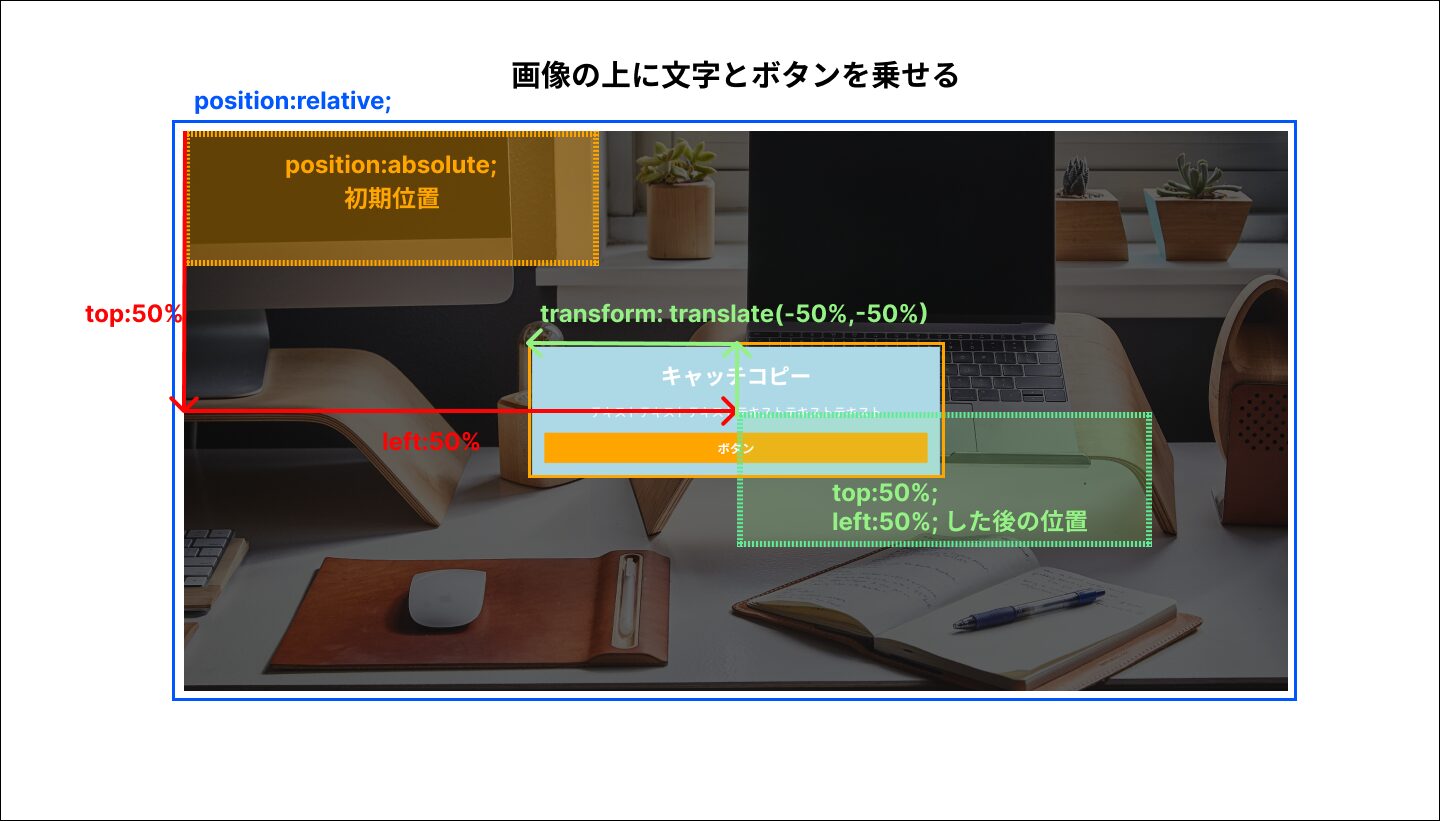
要素の配置は、topとleftプロパティ、transformプロパティで調整します。
例えば、以下のようにtopが0、leftが0と記述するとテキストのコンテンツは画像の左上に配置されます。絶対配置される要素は、親要素を基準に左上が初期位置となります。
.p-fv__textBox {
  position: absolute;
  top: 0;
  left: 0;
  width: 100%;
  text-align: center;
  max-width: 500px;
  z-index: 2;
  background-color: lightblue;
  padding: 16px;
}

今回の場合、画像の中央に配置するので、以下のように基準位置の上から50%、左に50%、そしてtransformプロパティと組み合わせて中央配置にしています。
.p-fv__textBox {
  position: absolute;
  top: 50%;
  left: 50%;
  transform: translate(-50%,-50%);
  width: 100%;
  text-align: center;
  max-width: 500px;
  z-index: 2;
  background-color: lightblue;
  padding: 16px;
}
まとめ
CSSで画像の上に文字とボタンをのせる方法について解説しました。
absoulteプロパティで配置する場合は、その親要素にposition:relative;を指定するのを忘れないようにしましょう!