この記事では「CSSのよく使うマウスホバー」について解説します。
単にマウスホバーといっても、さまざまな方法がありますが、基本中の基本なので覚えておくといいでしょう。
- マウスホバーの基本的なやり方が分かる
- マウスホバーの種類が分かる
マウスホバー時のCSSで少し難易度が高いマスクをかけた上に文字を記載する方法もまとめています。
併せて読んでみてください。
目次
CSSのマウスホバーの基本
マウスホバーの種類解説の前に、マウスホバーの基本から解説します。
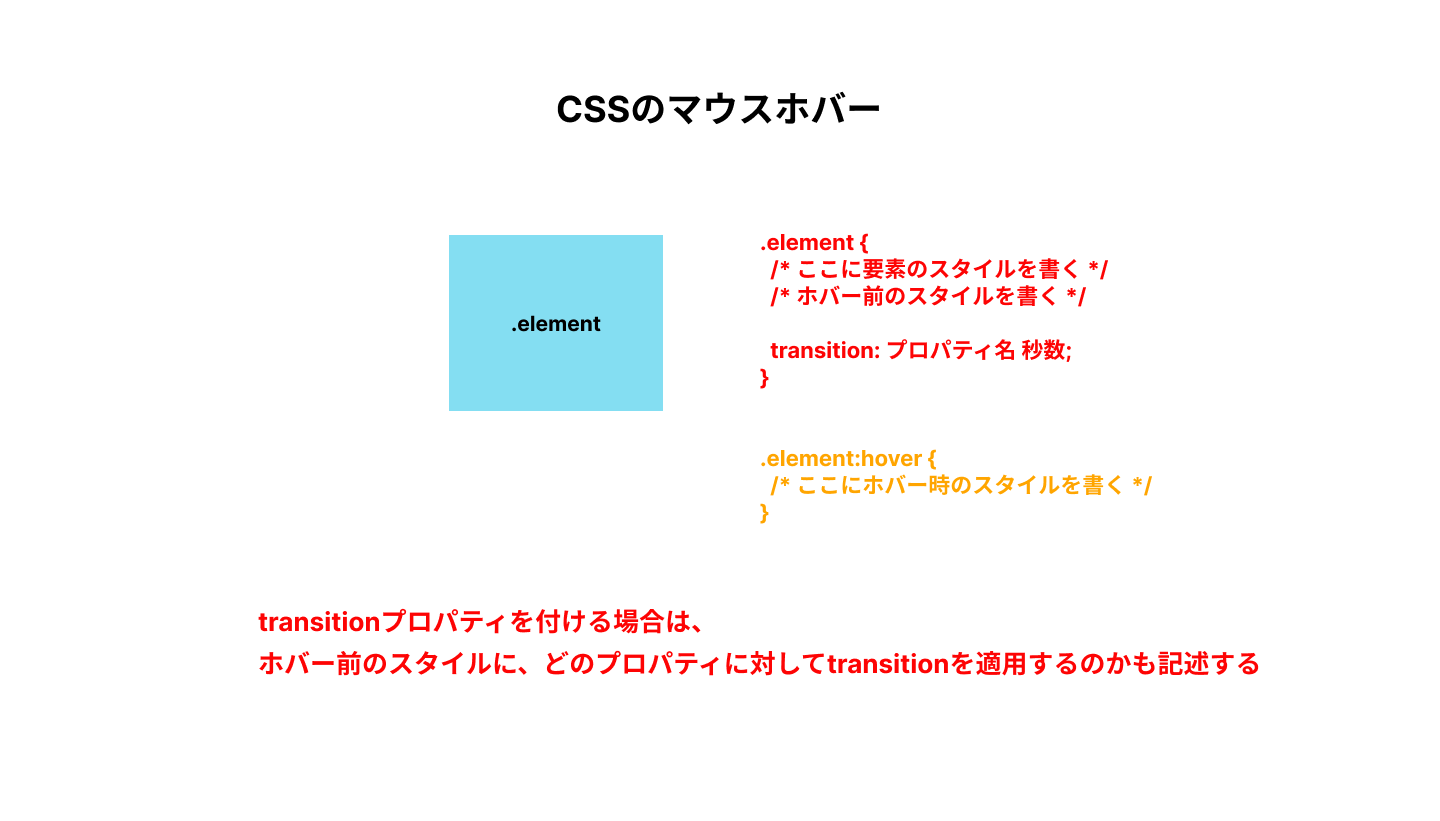
基本的には次のように、要素にホバーしたときのスタイルを適用します。
<div class="element">
  要素
</div>
.element {
/* ここに要素のスタイルを書く */
}
.element:hover {
/* ここにホバー時のスタイルを書く */
}

ホバー時のスタイルはさまざまありますが、よく使うものでは大きく分けて以下のものがあります。
- 透過
- 回転
- 色の変化
- 要素が動く
- 要素の拡大・縮小
- テキストに下線
透過
要素のホバー時に透過する場合は、以下の記述になります。
See the Pen 透過 by 山中滉大 (@tips-web) on CodePen.
<div class="element">
 要素
</div>
.element {
background-color: skyblue;
color: #000;
padding: 8px;
display: inline-block;
min-width: 100px;
text-align: center;
cursor: pointer;
/* 調整用 */
margin-top: 40px;
margin-left: 40px;
/* 透過 */
transition: opacity .4s;
}
/* 透過 */
.element:hover {
opacity: .5;
}
opacityプロパティで透過することができます。
なお、ホバーを適用した要素にはtransitionプロパティを指定し、その際に「どのプロパティに対してtransitionを適用するのか」も記述しましょう。
上記の場合、以下の部分がopacityプロパティに対して0.4秒のtransitionを適用しています。
transition: opacity .4s;色反転
要素のホバー時に要素の色を反転する場合は、以下の記述になります。
See the Pen 色反転 by 山中滉大 (@tips-web) on CodePen.
.element {
  background-color: skyblue;
  color: #000;
  padding: 8px;
  display: inline-block;
  min-width: 100px;
  text-align: center;
  cursor: pointer;

  /* 調整用 */
  margin-top: 40px;
  margin-left: 40px;

  /* 色反転 */
  transition: background-color .4s, color .4s;
}

/* 色反転 */
.element:hover {
  background-color: #000;
  color: skyblue;
}
こちらの場合もtransitionプロパティを適用しますが、複数のプロパティがホバー時に変わる場合(上記の例だとbackground-colorとcolor)、transitionプロパティで以下のように複数のプロパティを記述します。
transition: background-color .4s, color .4s;押し込む
要素のホバー時に要素が押し込まれるような動きをする場合は、以下の記述になります。
See the Pen 押し込む by 山中滉大 (@tips-web) on CodePen.
.element {
  background-color: skyblue;
  color: #000;
  padding: 8px;
  display: inline-block;
  min-width: 100px;
  text-align: center;
  cursor: pointer;

  /* 調整用 */
  margin-top: 40px;
  margin-left: 40px;

  /* 押し込む */
  border-bottom: 3px solid rgb(107, 142, 156);
  transition: transform .4s,border-bottom-color .4s;

}


/* 押し込む */
.element:hover {
  border-bottom-color: transparent;
  transform: translateY(3px);

}
浮き上がる
要素のホバー時に要素が浮き上がる動きをする場合は、以下の記述になります。
See the Pen 浮き上がる by 山中滉大 (@tips-web) on CodePen.
.element {
  background-color: skyblue;
  color: #000;
  padding: 8px;
  display: inline-block;
  min-width: 100px;
  text-align: center;
  cursor: pointer;

  /* 調整用 */
  margin-top: 40px;
  margin-left: 40px;

  /* 浮き上がる */
  box-shadow: 0 0 3px 0 rgba(0, 0, 0, 0.25);
  transition: transform .4s, box-shadow .4s;

}


/* 浮き上がる */
.element:hover {
  box-shadow: 0 3px 6px 0 rgba(0, 0, 0, 0.25);
  transform: translateY(-3px);
}
ポイントは、ホバー時に要素が上に移動した際に、影を広げて浮かんでいるようにみせることです。
x軸回転
要素のホバー時にx軸で回転させる場合は、以下の記述になります。
See the Pen x軸で回転 by 山中滉大 (@tips-web) on CodePen.
.element {
  background-color: skyblue;
  color: #000;
  padding: 8px;
  display: inline-block;
  min-width: 100px;
  text-align: center;
  cursor: pointer;

  /* 調整用 */
  margin-top: 40px;
  margin-left: 40px;

  /* x軸で回転 */
  transition: transform .4s;


}


/* x軸で回転 */
.element:hover {
  transform: rotateX(360deg);
}
ホバーすると、x軸を中心に回転します。
y軸で回転
要素のホバー時にy軸で回転させる場合は、以下の記述になります。
See the Pen y軸で回転 by 山中滉大 (@tips-web) on CodePen.
.element {
  background-color: skyblue;
  color: #000;
  padding: 8px;
  display: inline-block;
  min-width: 100px;
  text-align: center;
  cursor: pointer;

  /* 調整用 */
  margin-top: 40px;
  margin-left: 40px;

  /* y軸で回転 */
  transition: transform .4s;
}


/* y軸で回転 */
.element:hover {
  transform: rotateY(360deg);
}
ホバーすると、y軸を中心に回転します。
z軸で回転
要素のホバー時にz軸で回転させる場合は、以下の記述になります。
See the Pen z軸で回転 by 山中滉大 (@tips-web) on CodePen.
.element {
  background-color: skyblue;
  color: #000;
  padding: 8px;
  display: inline-block;
  min-width: 100px;
  text-align: center;
  cursor: pointer;


  /* 調整用 */
  margin-top: 40px;
  margin-left: 40px;

  /* z軸で回転 */
  transition: transform .4s;
}


/* z軸で回転 */
.element:hover {
  transform: rotateZ(360deg);
}
ホバーすると、z軸を中心に回転します。
拡大
要素のホバー時に要素を拡大させる場合は、以下の記述になります。
See the Pen 拡大 by 山中滉大 (@tips-web) on CodePen.
.element {
  background-color: skyblue;
  color: #000;
  padding: 8px;
  display: inline-block;
  min-width: 100px;
  text-align: center;
  cursor: pointer;

  /* 調整用 */
  margin-top: 40px;
  margin-left: 40px;

  /* 拡大 */
  transition: transform .4s;
}

/* 拡大 */
.element:hover {
  transform: scale(1.1);
}
色が変わる
要素のホバー時に色を変える場合は、以下の記述になります。
See the Pen 色が変わる by 山中滉大 (@tips-web) on CodePen.
<p class="text">テキストテキスト</p>.text {
color: #000;
display: inline-block;
text-align: center;
cursor: pointer;
/* 調整用 */
margin-top: 40px;
margin-left: 40px;
/* テキストの色変わる */
transition: color .4s;
}
/* テキストの色変わる */
.text:hover {
color: red;
}
アンダーライン
要素のホバー時に下線を表示する場合は、以下の記述になります。
See the Pen アンダーライン by 山中滉大 (@tips-web) on CodePen.
.text {
  color: #000;
  display: inline-block;
  text-align: center;
  cursor: pointer;


  /* 調整用 */
  margin-top: 40px;
  margin-left: 40px;

  /* アンダーライン */
 position: relative;

}


/* アンダーライン */
.text::before {
  position: absolute;
  content: "";
  width: 0;
  height: 2px;
  bottom: 0;
  left: 0;
  background-color: skyblue;
  transition: width .4s;
}
/* アンダーライン */
.text:hover::before {
  width: 100%;
}
下線は疑似要素で作成し、ホバー前ではwidthの値を0。ホバー時にwidthを100%にすることで下線が左から右に表示されます。
まとめ
よく使うCSSのマウスホバーについてまとめました。一つ一つは基本的なプロパティしか使っていないので、すぐに使うことができます。
ホバーをする際は、transitionプロパティの設定をプロパティごとに記述するのを忘れないようにしましょう。
簡単なデザインカンプを探している!!
という方は無料で解説付きのデザインカンプを配布しているのでぜひご使用ください。
.jpg)

